Posts

Showing posts from January, 2021

Frames on Strongback

Image
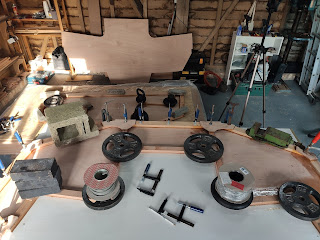
 25/01/2021 She's starting to look like a boat! Frames E, D and D1 went up in a similar fashion to T and A, so the next step was to slot the bunk sides into A and D1 to position S, C and B. With hindsight it may have made sense to mount D1 first, and then A and the bunk side together, but instead we cut the tabs on the bunk sides short and it worked out ok. Extra strength will be added in the filleting, but probably not necessary. The only consideration we found was to square off some slots and bevel some edges.  After the bunk sides we moved to the cockpit sides. securing them onto A and T. The top of S was then dropped into the slot in the bunk sides and found a perfect line running down the cockpit side and to its timber on the strong back. Move B and C into position and all frames are mounted.  We also put the knee and stem into position (missing from the photos). Relatively strait forward process from the B&B plans.  Freddie

Keel floors

Image
 23/01/2021 Timber was bought pre-cut to the 60*70 required and in a mix of lengths roughly the right size. Using the full size stencil provided by B&B; I transferred the angles notches for the stringers. The rest follows as pictured.  Freddie

Strongback

Image
 22/01/2021 Great day putting the strongback together. The plans from B&B were invaluable, using the inside after corner as datum took away issues with not all 6*2 being created equal. We only marginally went rogue, in part due to some errors with saw cuts, partly an error with the timber order, but the important distances between the frames were kept accurate.  Our concrete floor isn't too level, so the height of the frame needed to be adjusted with wedges. Once the upright timbers are installed they act as feet to keep it in place, their end height not being particularly important.  Also managed to put up frames T and A. A string-line down the centre of the framework, laser-level on top of it, set the height for the top of the frame, make it all line up and screw it in. Some blocks on the posts for the frames to sit on are helpful.  Freddie

Sticking the stringers together

Image
 20/01/2021 We cobbled together an assortment of tables, battens and wedges to make a consistent level. Once everything was in place we ran through the glueing and clamping very quickly, probably using about 100g of resin. Again, pre-cut timber from Fyne Boat Kits sped the process up dramatically.  Freddie

Sanding and sealing frames

Image
 19/01/2021 Sanded and sealed all frames bar D1 and S. Standard mix of epoxy used and applied with a roller. I left the outside of the frames dry as they will require bevelling and will be coated while planking.  Cant really take photos while gloved up and covered in glue.  Freddie

D1 Mess up & correction

Image
 18/01/2021 After checking on the frame in the morning, I found a problem. The starboard mast support appeared to have lifted from the plywood over night. What had actually happened was the opposite. We have been glueing on top of the stack of plywood with out issue, but having but out the bunk sides prior to joining them together, the ply no longer offered a level surface. The weight applied to the top of the frames had bent it round slightly and so a void had formed between the ply and mast support.  Fortunately the resin hadn't worked its magic yet and so it was a simple process of raising the temperature with the heat gun and heater, and slowly slowly lifting it with wedges.  Cleaning off the half-cured epoxy took a while, then changed the position of the panel, and stuck the mast support back on.  Laminated the knee too. Freddie

Finishing D1, glueing bunk sides & the first of the stringer scarfs.

Image
 17/01/2021 Finished off D1 with keel floor, mast support and laminated block. Gusset has been provided to cover the top of the panel, but debating whether or not this is needed.  We also started gluing the stringers together. Having bought them with pre-cut joins, the process was very simple.  Freddie

Frames C & (half of) S

Image
 13/01/2021 Morning spent sanding the frames that are already complete. This rids the wood of the excess epoxy that oozed out from compression, and prepares it for waterproofing/sealing. The sander's dust bag was missing so made a complete mess of the barn...will make a plan for future.  Smooth drills getting the frames together now: dry run first, gussets screwed in place once the measurements are correct. Once this is done, mix the epoxy and, one by one, unscrew gussets, apply resin, then screw gussets back in place, letting the screws find their previous home. Only marginal adjustment needed before clamping down. Wipe off excess epoxy to save sanding. Heat gun is used to warm the joints gently, then up goes the plastic tent, and heater underneath.  Freddie

Frames B, E & D

Image
 11/01/2021 No dramas for the second set of frames. I waited until the weather changed over night to the south-west and ended the week of hard frosts. B and E I did by myself and so was appreciative of the the slow-hardener and still mild temperatures, allowing for quite a long pot-life of the epoxy. This allowed plenty of time to get all the measurements accurate before screwing in the gussets, clamping and weighing down.  Pelham was free to help in the afternoon with frame D which made all much smoother and the tape measure, drill and driver managed to stay free from resin. Freddie

Frames T & A

Image
08/01/2021 Finally got started assembling the frames. We started with T and A as they looked to be the simplest, as it is only a case of glueing the soft wood to ply cut outs, and then gussets on top. With three of us on hand, it all went very smoothly. Due to the low temperatures we set a sheet of plastic over the top with a heater underneath so the epoxy could cure.